User Guide
Are you an NUS Teaching Assistant (TA) in the School of Computing (SoC), struggling to keep track of your classes?
If you’re looking for a centralised and user-friendly system to keep TAbs on your TA duties, look no further: TAbs is here!
With so many students in so many tutorials, labs and recitations, it’s easy to lose track of your students’ attendance.
TAbs is a desktop app created just for you to manage your classes—while it’s optimised for use via a Command Line Interface (CLI),
it still has the benefits of a Graphical User Interface (GUI).
- Quick start
-
Features
- Input Field Validation
- Viewing help:
help - Listing all tutorials:
list - Adding a tutorial:
add_tutorial - Deleting a tutorial:
delete_tutorial - Copying a tutorial:
copy_tutorial - Editing a tutorial:
edit_tutorial - Finding tutorials by keyword:
find - Listing all the students in a tutorial:
list_students - Adding students to a tutorial:
add_student - Deleting a student from a tutorial:
delete_student - Marking students in a tutorial as present:
mark - Marking ALL students in a tutorial as present:
mark_all - Unmarking students in a tutorial:
unmark - Unmarking ALL students in a tutorial:
unmark_all - Clearing all tutorials:
clear - Exiting the program:
exit - Saving the data
- Editing the data file
- Future plans (current version: v1.6; coming in
v2.0)
- FAQ
- Known issues
- Command summary
Quick start
-
It is recommended to have Java
17installed in your computer in order to run this application.
Mac users: Ensure you have the recommended JDK version prescribed here. -
Download the latest
.jarfile from here. -
Copy the file to the folder you want to use as the home folder for TAbs.
- Open a command terminal,
cdinto the folder you put the.jarfile in, and run the following command to start the application:java -jar TAbs.jarA GUI similar to the one below should appear in a few seconds. Note that the app may contain sample data.

-
Type your commands in the command box and press Enter to execute them, e.g., typing
helpand pressing Enter will open the help window.
Some example commands you can try:-
list: Lists all tutorials. -
add_tutorial t/T123 m/CS2103T d/2025-01-01: Adds a tutorial with IDT123for the moduleCS2103T. -
list_students t/T1: Displays a list of all the students enrolled in the tutorial with IDT1. -
delete_tutorial t/T1: Deletes the tutorial with IDT1. -
clear: Deletes all tutorials. -
exit: Exits the app.
-
- Refer to the features below for details of each command.
Features
 Notes about the command format:
-
Words in
UPPER_CASEare the parameters to be supplied by the user.
(e.g., inadd_tutorial t/TUTORIAL_ID,TUTORIAL_IDis a parameter which can be used asadd_tutorial t/T123.) -
Items in square brackets are optional.
(e.g.,t/TUTORIAL_ID [id/STUDENT]…can be used ast/T123 id/A1234567Xor ast/T123.) -
Items with
…after them can be used multiple times, including zero times.
(e.g.,t/TUTORIAL_ID [id/STUDENT]…can be used ast/T123(i.e., 0 times),t/T123 id/A1234567X,t/T123 id/A1234567X id/A2234567Y, etc.) -
Parameters can be in any order.
(e.g., if the command specifiest/TUTORIAL_ID m/MODULE_CODE,m/MODULE_CODE t/TUTORIAL_IDis also acceptable.) -
Command names are case-sensitive and must be in lowercase (e.g.,
add_tutorial, notADD_TUTORIAL). -
Prefixes are also case-sensitive and must be in lowercase (e.g.,
t/,m/,id/, notT/,M/,ID/). -
Extraneous parameters for commands that do not take in parameters (such as
help,list,exitandclear) will be ignored.
(e.g., if the command specifieshelp 123, it will be interpreted ashelp.) -
If you are using a PDF version of this document, be careful when copying and pasting commands that span multiple lines as space characters surrounding line-breaks may be omitted when copied over to the application.
Input Field Validation
TAbs validates all input fields to ensure data integrity. Below are the validation rules for each field type:
| Field Type | Prefix | Format Requirements | Valid Examples | Invalid Examples |
|---|---|---|---|---|
| Tutorial ID | t/ |
- Single letter (case-insensitive) - Followed by 1-8 digits - Automatically converted to uppercase |
T1 or t1A123 or a123B12345678 or b12345678
|
12T (starts with digit)TT123 (two letters)T123456789 (too many digits) |
| Module Code | m/ |
- 2-4 letters (case-insensitive) - Followed by 4 digits - Optional letter at end (case-insensitive) - Automatically converted to uppercase |
CS2103T or cs2103tMA1521 or ma1521GESS1000 or gess1000
|
CS210 (too few digits)COMPUTING2103 (too many letters)CS21033 (too many digits) |
| Date | d/ |
- Format: YYYY-MM-DD - Must be valid calendar date - Year must be between 1998 and 2200 |
2025-01-01, 2024-12-31, 2025-03-15
|
01-01-2025 (wrong order)2025/01/01 (wrong separator)2025-02-30 (invalid date)1997-01-01 (year too old)2201-01-01 (year too far ahead) |
| Student ID | id/ |
- Pattern: AXXXXXXX& (case-insensitive)- First character: Letter ‘A’ - Next 7 characters: Digits - Last character: Any letter - Automatically converted to uppercase |
A1234567X or a1234567xA9876543B or a9876543bA0123456C or a0123456c
|
B1234567X (doesn’t start with ‘A’)A123456X (too few digits)A12345678X (too many digits) |
| Source Tutorial | from/ |
- Same rules as Tutorial ID - Used in copy_tutorial and edit_tutorial- Automatically converted to uppercase |
T1 or t1C101 or c101A12345678 or a12345678
|
Same as Tutorial ID invalid examples |
Validation Tips:
- All text fields are case-insensitive and will be automatically converted to uppercase for consistency.
- TAbs will display specific error messages when validation fails, indicating which field has an issue and what format is expected.
- If multiple fields are invalid, TAbs will report the first invalid field encountered.
- All validation is performed before any changes are made to your data, ensuring data integrity.
-
Note: The
findcommand is the only command that does not enforce strict format validation on the prefix values. It only requires that keywords are alphanumeric (letters and digits only).
Viewing help: help
Shows a message explaining how to access the help page.

Format: help
Listing all tutorials: list
Shows a list of all tutorials in TAbs.
Format: list
Adding a tutorial: add_tutorial
Adds a tutorial to TAbs.
Format: add_tutorial t/TUTORIAL_ID m/MODULE_CODE d/DATE [id/STUDENT_ID]…
- Adds a tutorial with the specified tutorial ID, module code and date.
- Multiple students can be added to the same tutorial.
- If duplicate student IDs are specified in the same command, only unique students will be added (duplicates are automatically ignored).
- Maximum limit: Each tutorial can have a maximum of 100 students. Attempting to create a tutorial with more than 100 students will be rejected.
Examples:
add_tutorial t/C456 m/CS2101 d/2025-01-01add_tutorial t/T123 m/CS2103T d/2025-01-01 id/A1231231Y id/A3213213Y
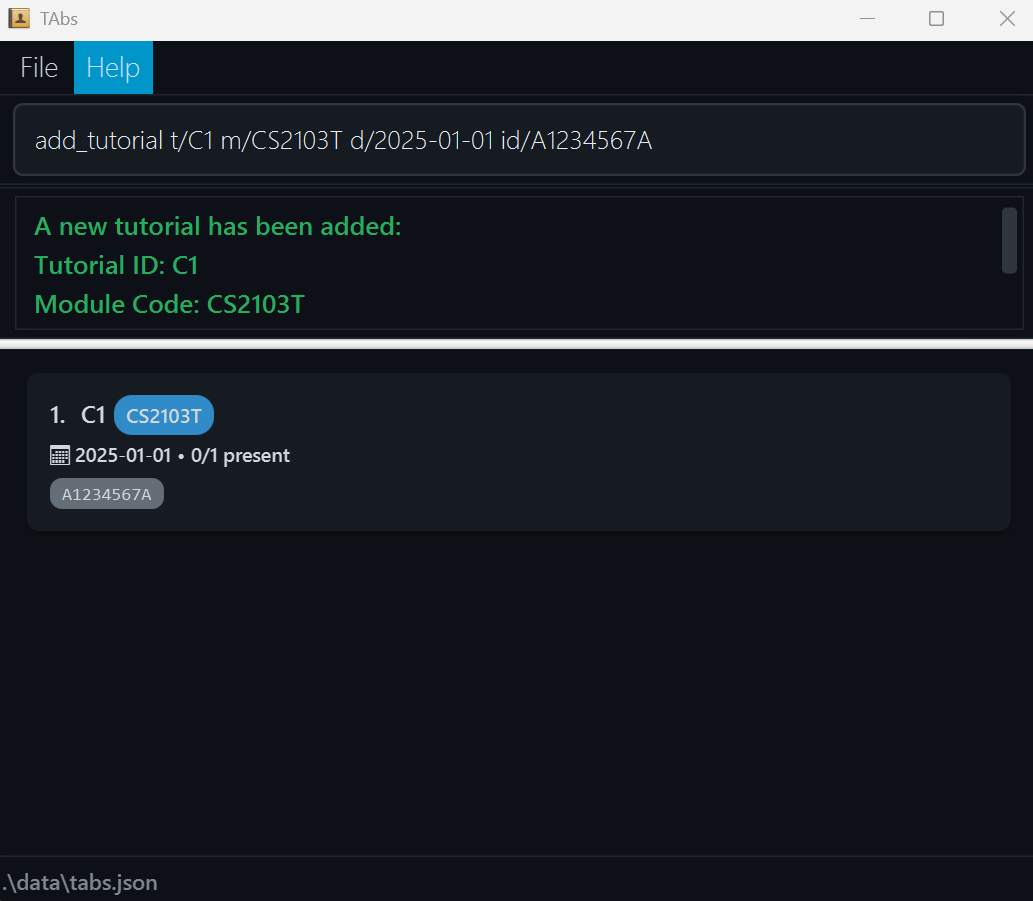
After a tutorial has been added, the GUI will display the newly created tutorial card in the tutorial list as shown below. The card shows the tutorial’s tutorial ID, module code, date, and the list of enrolled students (if any). All students in the new tutorial will initially be unmarked (displayed with their IDs in grey color).
Deleting a tutorial: delete_tutorial
Deletes the specified tutorial from TAbs.
Format: delete_tutorial t/TUTORIAL_ID
- Deletes the tutorial with the specified
TUTORIAL_ID. -
TUTORIAL_IDmust already exist in TAbs.
Examples:
-
delete_tutorial t/T2deletes the tutorial with IDT2in TAbs.
Copying a tutorial: copy_tutorial
Creates a copy of an existing tutorial with a new tutorial ID and date.
Format: copy_tutorial t/NEW_TUTORIAL_ID from/EXISTING_TUTORIAL_ID d/DATE
- Copies an existing tutorial identified by the existing tutorial’s ID and creates a new tutorial with a new ID and the specified date.
-
NEW_TUTORIAL_IDmust not already exist in TAbs. - The
EXISTING_TUTORIAL_IDmust exist in TAbs. - All students from the existing tutorial will be copied to the new tutorial with their attendance reset to being unmarked.
- The module code will be copied from the existing tutorial.
Examples:
-
copy_tutorial t/C2 from/C1 d/2025-04-10copies the tutorialC1to create a new tutorialC2with the date2025-04-10. -
copy_tutorial t/T202 from/T201 d/2025-05-15copies the tutorialT201to create a new tutorialT202with the date2025-05-15.
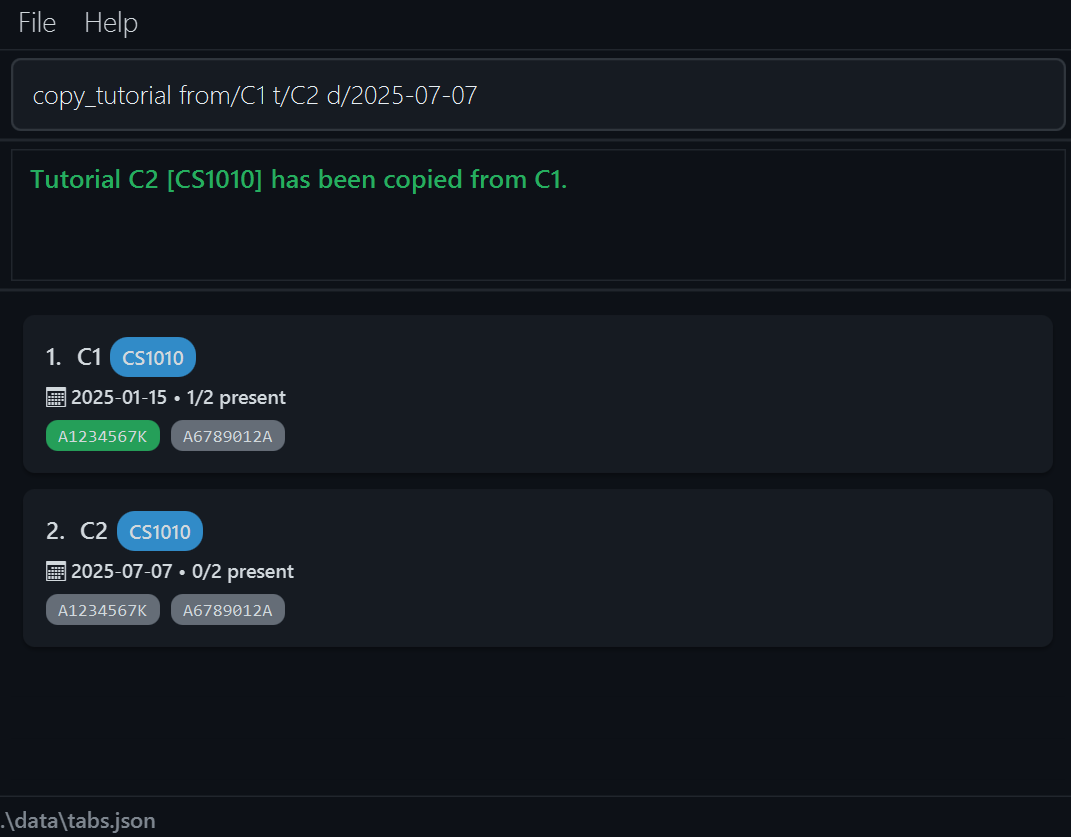
Below is an example of the copy command being used.
Editing a tutorial: edit_tutorial
Edits the details of an existing tutorial in TAbs.
Format: edit_tutorial from/EXISTING_TUTORIAL_ID [t/NEW_TUTORIAL_ID] [m/NEW_MODULE_CODE] [d/NEW_DATE]
- Updates the details of the tutorial identified by the tutorial ID specified after
from/.- Attempting to edit a non-existent tutorial will result in an error:
Tutorial ID not found.
- Attempting to edit a non-existent tutorial will result in an error:
- You may change one or more of the following:
- Tutorial ID (
t/) - Module code (
m/) - Date (
d/)
- Tutorial ID (
- At least one editable field (
t/,m/, ord/) must be specified. - Editing student lists (i.e., using
id/) is not allowed here — useadd_studentordelete_studentinstead.
Examples:
-
edit_tutorial from/T123 t/T456renames the tutorial with IDT123toT456. -
edit_tutorial from/T456 m/CS2103T d/2025-10-25updates the tutorial with IDT456to have module codeCS2103Tand date2025-10-25. -
edit_tutorial from/T123 t/T789 m/CS2040S d/2025-08-20updates the tutorial with IDT123to:- Have new ID
T789 - Change its module code to
CS2040S - Set its new date to
2025-08-20
- Have new ID
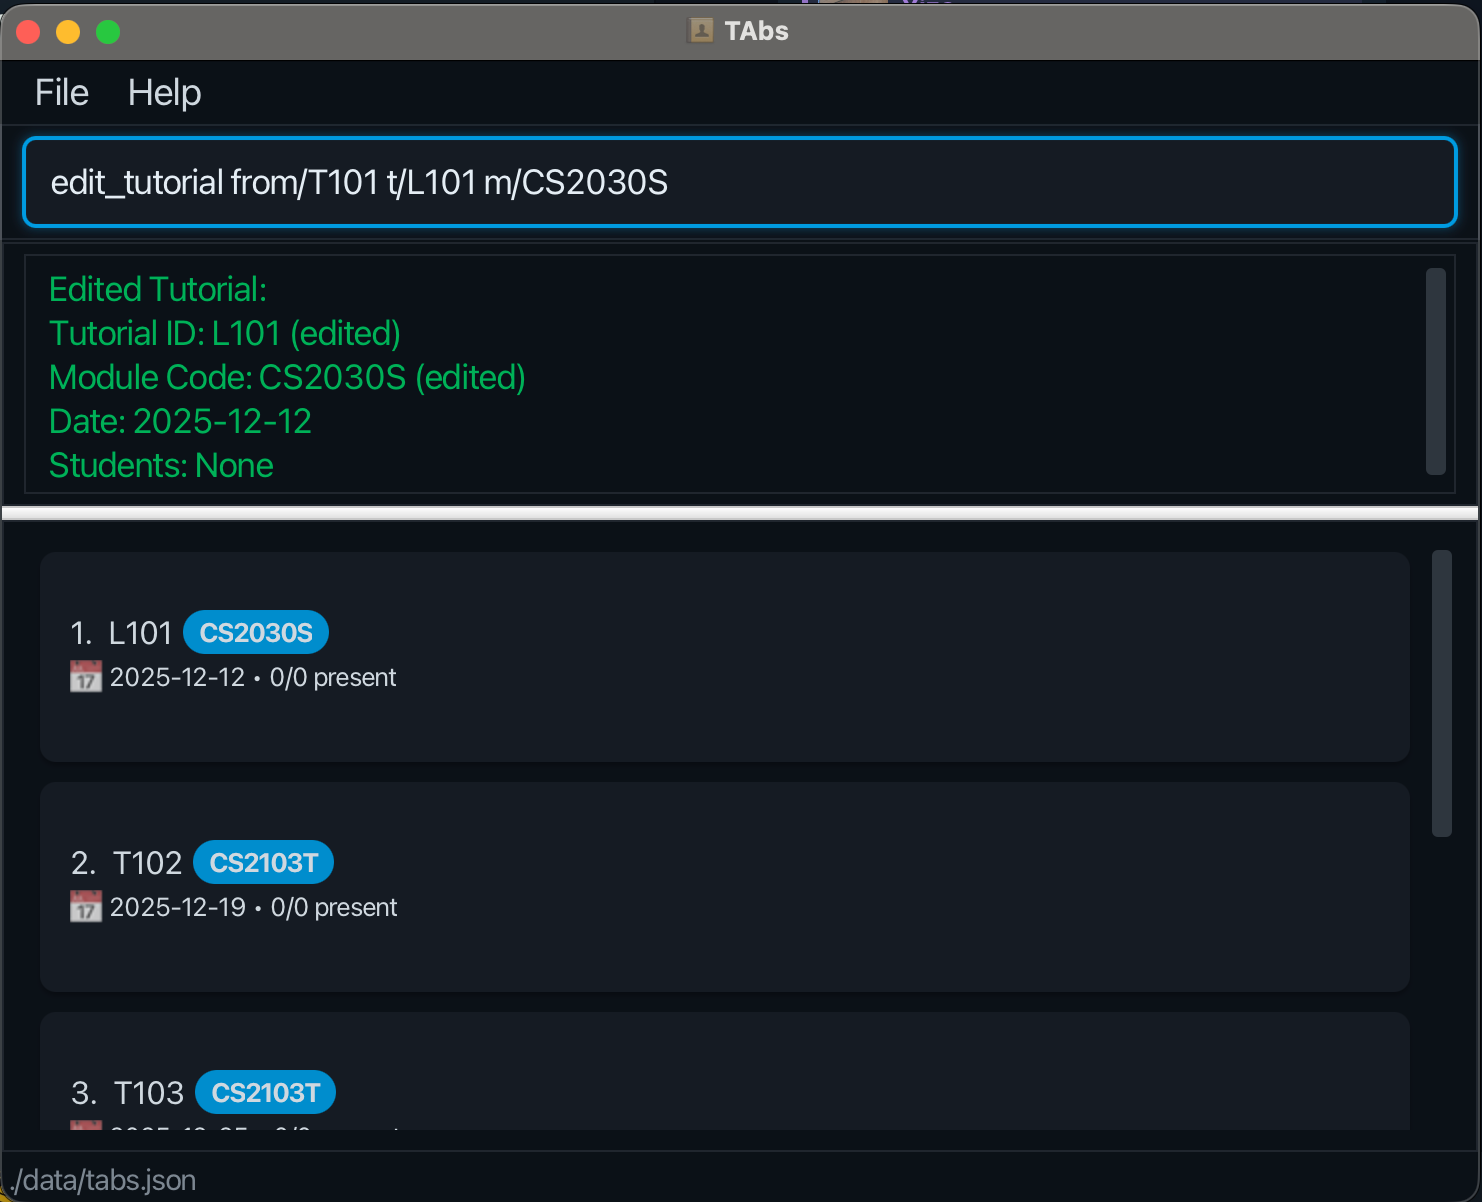
Below is an example of the edit command being used.
Finding tutorials by keyword: find
Finds tutorials whose tutorial ID and/or module code contain any of the given keywords.
Format:
-
Search by one field:
find t/KEYWORD [MORE_KEYWORDS]…orfind m/KEYWORD [MORE_KEYWORDS]… -
Search by both fields (AND condition):
find m/KEYWORD [MORE_KEYWORDS]… t/KEYWORD [MORE_KEYWORDS]…
- Each keyword must contain only alphanumeric characters (letters and digits).
- You can search by tutorial ID (
t/), module code (m/), or both. - Within each field, tutorials matching at least one keyword will be returned (i.e.,
ORsearch). - When searching by both fields, tutorials must match at least one keyword from each field (i.e.,
ANDbetween fields,ORwithin each field). - The search is case-insensitive (e.g.,
t01will matchT01). - Tutorial IDs or module codes which contain the keyword partially will also be matched (e.g.,
CS2103will matchCS2103T). -
Note: The
findcommand does not enforce strict format validation on Tutorial IDs or Module Codes. Keywords only need to be alphanumeric, allowing for more flexible searching compared to other commands that require exact format compliance.
Examples:
-
find m/CS2103T CS2101returns tutorials with module codeCS2103TORCS2101 -
find t/A101 B202returns tutorials with tutorial IDA101ORB202 -
find m/CS2103T t/A101returns tutorials with module codeCS2103TAND tutorial IDA101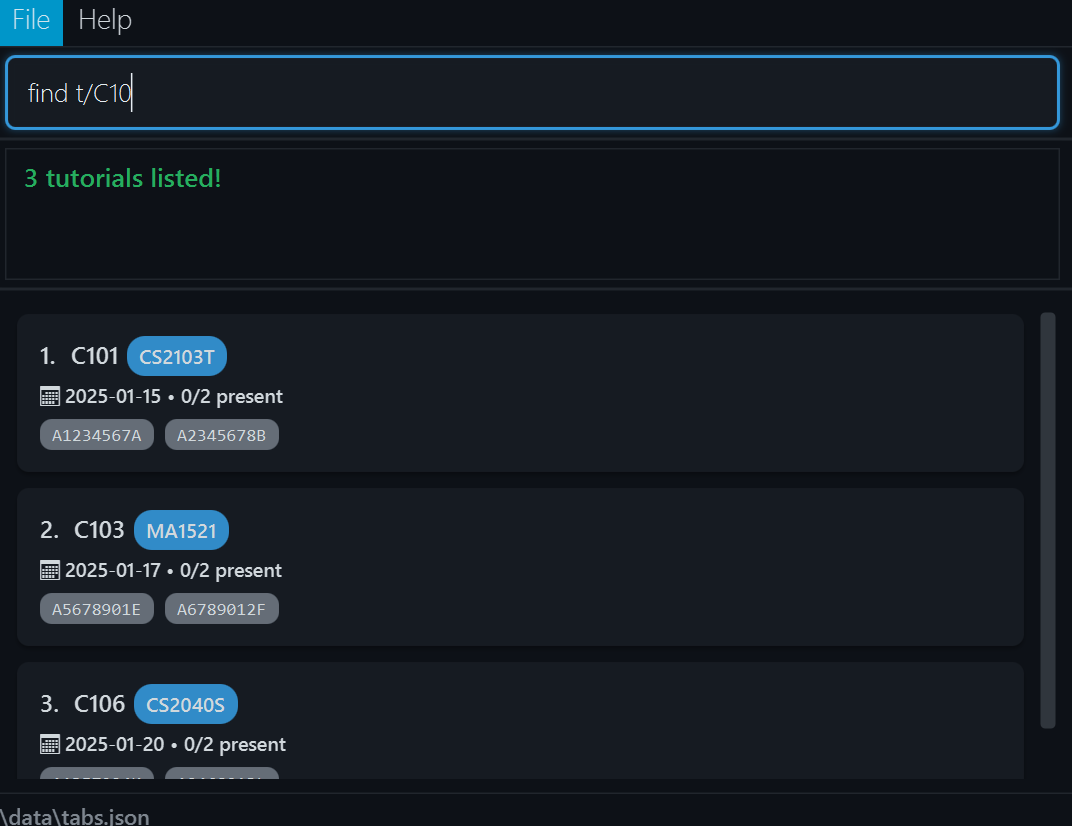
Listing all the students in a tutorial: list_students
Display a list of all the students enrolled in a specific tutorial on TAbs.
Format: list_students t/TUTORIAL_ID
- Lists all the students in a tutorial with the specified tutorial ID.
- It shows a numbered list of all the student IDs of the students in that tutorial (e.g.,
1. A1234567X).TUTORIAL_IDmust already exist in TAbs.
Examples:
-
list_students t/T2lists all the students in the tutorial with IDT2in TAbs.
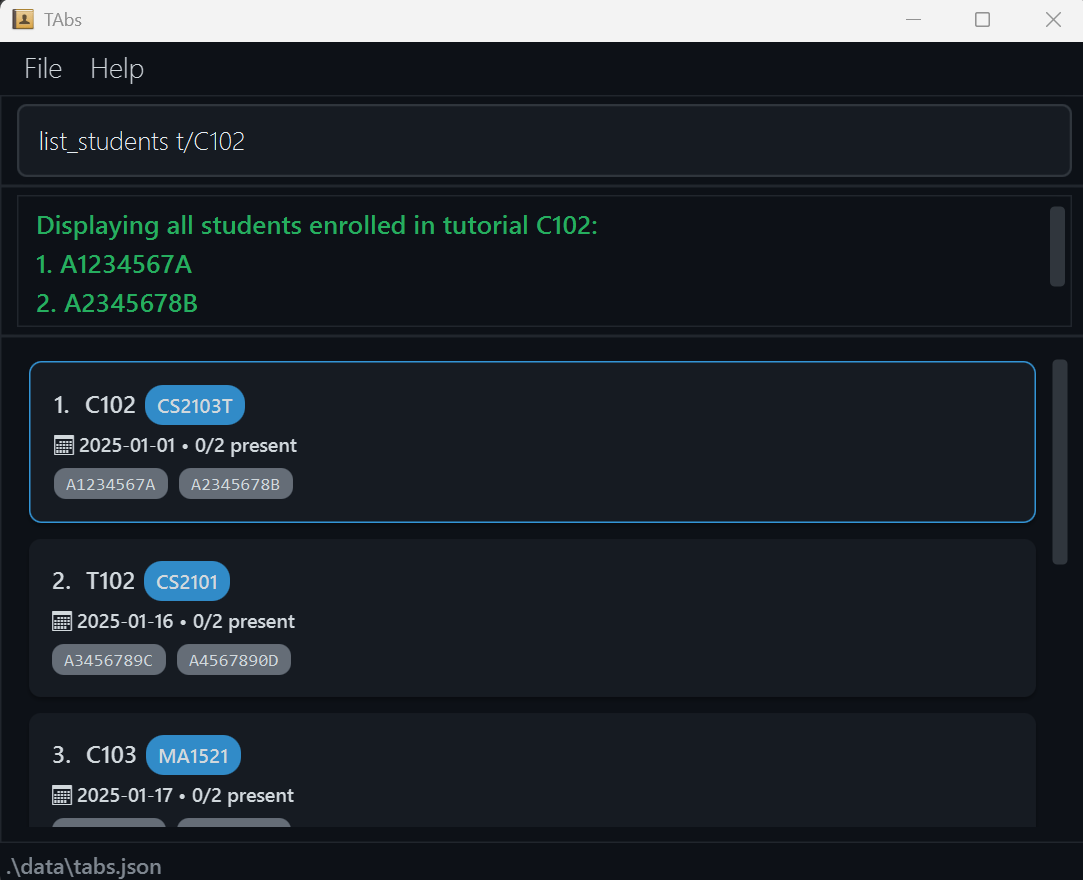
The list of students will be displayed in the output box as shown below.
Adding students to a tutorial: add_student
Adds one or more students to a specified tutorial in TAbs.
Format: add_student id/STUDENT_ID… t/TUTORIAL_ID
- Adds one or more students, identified by their student IDs, to the tutorial identified by the tutorial ID.
- You can specify multiple student IDs in a single command, separated by spaces.
-
TUTORIAL_IDmust already exist in TAbs. - Maximum limit: Each tutorial can have a maximum of 100 students. Adding students that would exceed this limit will be rejected.
Examples:
-
add_student id/A1231231Y t/T1adds a studentA1231231Yto tutorialT1. -
add_student id/A1231231Y id/A3213213Y id/A2223334B t/T2adds studentsA1231231Y,A3213213YandA2223334Bto tutorialT2.
Behaviour and duplicate handling:
-
If all specified students already exist in the tutorial, TAbs will reject the command and show an error message:
The following student(s): [[A1231231Y], [A3213213Y]] are already in tutorial T2! -
If some students already exist but others are new, TAbs will:
- Add the new students successfully.
- Notify the user that certain students were already in the tutorial. Example:
The following student(s):
  [[A2223334B]]
were added to tutorial T2.

The following student(s):
  [[A1231231Y], [A3213213Y]]
are already in tutorial T2!
Deleting a student from a tutorial: delete_student
Deletes the specified student from the specified tutorial from TAbs.
Format: delete_student id/STUDENT_ID t/TUTORIAL_ID
- Delete a single student, identified by the student ID, from the tutorial identified by the tutorial ID.
- The
TUTORIAL_IDmust already exist in TAbs.
Examples:
-
delete_student id/A1231231Y t/T2deletes the student with IDA1231231Yfrom the tutorialT2.
Marking students in a tutorial as present: mark
Marks specified students in a tutorial in TAbs as present.
Format: mark id/STUDENT_ID… t/TUTORIAL_ID
- Marks one or more students, identified by their student ID, in the tutorial identified by the tutorial ID as present.
- You can specify multiple student IDs in a single command, separated by spaces.
- The
TUTORIAL_IDmust already exist in TAbs.
Examples:
-
mark id/A1231231Y t/C456marks studentA1231231Yin tutorialC456as present. -
mark id/A1231231Y id/A3213213Y t/T123marks studentsA1231231YandA3213213Yin tutorialT123as present.
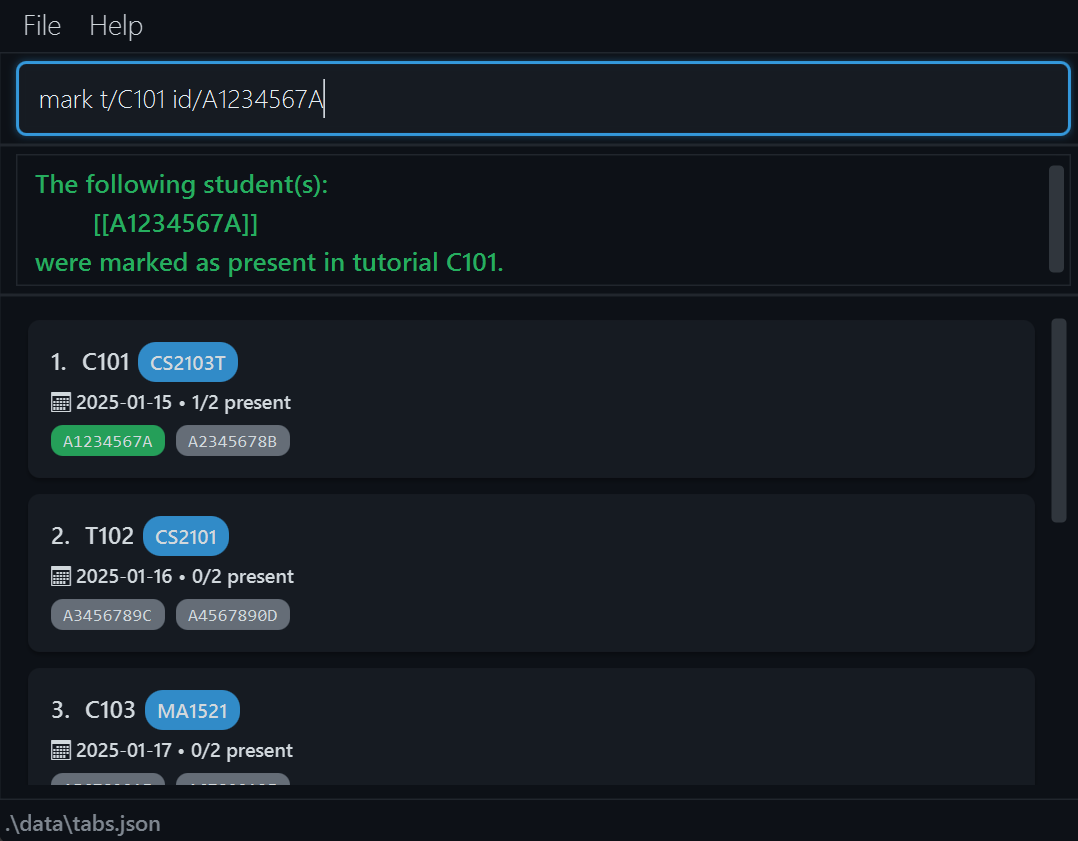
When a student has been marked as present, the GUI will update the student’s ID within the tutorial to green as shown below.
Behaviour:
- After the mark command has been run, the students in the input will be categorised into 3 groups: successfully marked, already marked, and not in the tutorial.
- If no students were successfully marked, TAbs will display the message as an error.
- If at least one student was successfully marked, TAbs will display a success outcome.
- The following are messages that will be conditionally displayed based on whether any students
fall in the respective groups.
- Students who were successfully marked as present:
The following student(s): [[A1231231Y], [A3213213Y]] were marked as present in tutorial T2. - Students who have already been marked:
The following student(s): [[A1231231Y], [A3213213Y]] were already marked as present. - Students who do not exist in the tutorial:
The following student(s):
[[A1231231Y], [A3213213Y]]
are not in tutorial T2.
- Students who were successfully marked as present:
- If there are no students in that particular group, the message for that group will not be shown.
Marking ALL students in a tutorial as present: mark_all
Marks all students in a tutorial in TAbs as present.
Format: mark_all t/TUTORIAL_ID
- Marks all the students as present in the tutorial identified by the tutorial ID.
- The
TUTORIAL_IDmust already exist in TAbs. - Note: Unlike
mark,mark_alldoes not notify the user as to which students have already been marked, since such a notification is unlikely to be meaningful.
Examples:
-
mark_all t/C456marks every student in the tutorial with IDC456as present.
Unmarking students in a tutorial: unmark
Unmarks specified students in a tutorial in TAbs.
Format: unmark id/STUDENT_ID… t/TUTORIAL_ID
- Unmarks one or more students, identified by their student ID, in the tutorial identified by the tutorial ID.
- You can specify multiple student IDs in a single command, separated by spaces.
- The
TUTORIAL_IDmust already exist in TAbs.
Examples:
-
unmark id/A1231231Y t/C456unmarks studentA1231231Yin tutorialC456. -
unmark id/A1231231Y id/A3213213Y t/T123unmarks studentA1231231Yand studentA3213213Yin tutorialT123.
Behaviour:
- The behaviour of unmark is similar to that of mark. Kindly refer to the behaviour section of the mark command above.
Unmarking ALL students in a tutorial: unmark_all
Unmarks all students in a tutorial in TAbs.
Format: unmark_all t/TUTORIAL_ID
- Unmarks all the students in the tutorial identified by the tutorial ID.
- The
TUTORIAL_IDmust already exist in TAbs. - Note: Unlike
unmark,unmark_alldoes not notify the user as to which students have already been unmarked, since such a notification is unlikely to be meaningful.
Examples:
-
unmark_all t/C456unmarks every student in the tutorial with IDC456.
Clearing all tutorials: clear
Removes all tutorials from TAbs.
Format: clear
Exiting the program: exit
Exits the TAbs application.
Format: exit
Saving the data
TAbs data are saved in the hard disk automatically after any command that changes the data. There is no need to save manually.
Editing the data file
TAbs data are saved automatically as a JSON file [JAR file location]/data/TAbs.json. Advanced
users are welcome to update data directly by editing that data file.
 Caution:
If your changes to the data file makes its format invalid, TAbs will discard all data and start with an empty data file at the next run. Hence, it is recommended to take a backup of the file before editing it.
Furthermore, certain edits can cause TAbs to behave in unexpected ways (e.g., if a value entered is beyond the acceptable range). Therefore, edit the data file only if you are confident that you can update it correctly.
Future plans (current version: v1.6; coming in v2.0)
We intend to release an even more user-friendly version to the wider NUS community, featuring a proper user interface without the need of a CLI.
FAQ
Q: How do I transfer my data to another computer?
A: Install the app on the other computer and run it once to generate the initial data file.
Close the app, then overwrite the TAbs.json file it creates (which contains sample data) with the
TAbs.json file that contains your data from your previous TAbs home folder. The file can be found at
[JAR file location]/data/TAbs.json. After replacing the file, run the app again to use your transferred data.
Known issues
-
When using multiple screens, if you move the application to a secondary screen, and later
switch to using only the primary screen, the GUI will open off-screen. The remedy is to delete
the
preferences.jsonfile created by the application before running the application again. -
If you minimize the Help Window and then run the
helpcommand (or use theHelpmenu, or the keyboard shortcutF1) again, the original Help Window will remain minimized, and no new Help Window will appear. The remedy is to manually restore the minimized Help Window.
Command summary
| Action | Format, Examples |
|---|---|
| Help | help |
| List tutorials | list |
| Add a tutorial |
add_tutorial t/TUTORIAL_ID m/MODULE_CODE d/DATE [id/STUDENT_ID]… (e.g., add_tutorial t/T123 m/CS2103T d/2025-01-01 id/A1231231Y) |
| Delete a tutorial |
delete_tutorial t/TUTORIAL_ID(e.g., delete_tutorial t/T1) |
| Copy a tutorial |
copy_tutorial t/NEW_TUTORIAL_ID from/EXISTING_TUTORIAL_ID d/DATE (e.g., copy_tutorial t/C2 from/C1 d/2025-04-10) |
| Edit a tutorial |
edit_tutorial from/EXISTING_TUTORIAL_ID [t/NEW_TUTORIAL_ID] [m/NEW_MODULE_CODE] [d/NEW_DATE](e.g., edit_tutorial from/T1 m/CS2103T d/2025-10-25) |
| Find tutorials |
find m/KEYWORD… t/KEYWORD… (either or both fields)(e.g., find m/CS2103T, find t/A101, find m/CS2103T t/A101) |
| List students in a tutorial |
list_students t/TUTORIAL_ID(e.g., list_students t/T1) |
| Add student(s) |
add_student id/STUDENT_ID… t/TUTORIAL_ID (e.g., add_student id/A1231231Y id/A3213213Y t/T2) |
| Delete a student |
delete_student id/STUDENT_ID t/TUTORIAL_ID (e.g., delete_student id/A3213213Y t/T123) |
| Mark a student |
mark id/STUDENT_ID… t/TUTORIAL_ID (e.g., mark id/A1231231Y id/A3213213Y t/T123) |
| Mark all students |
mark_all t/TUTORIAL_ID (e.g., mark_all t/T123) |
| Unmark a student |
unmark id/STUDENT_ID… t/TUTORIAL_ID (e.g., unmark id/A1231231Y id/A3213213Y t/T123) |
| Unmark all students |
unmark_all t/TUTORIAL_ID (e.g., unmark_all t/T123) |
| Clear all tutorials | clear |
| Exit TAbs | exit |